Windows 10 の入ったディスクのバックアップが clonezilla で外形的にできることがわかった Posted on Jun 27, 2020
Windows10 が載ってるディスクに破壊的な変更加える前にバックアップしたくて、SystemRescueCd で clonezilla 使ってディスクまるごとイメージ化した(内部的には partimage が使われてる?)。
— woremacx (@woremacx) June 15, 2020
でこれ、レストアしたら起動する状態まで持っていけるんかな? すんごく不安だ。。。
systemrescuecd に同梱されている clonezilla を使ってまるまる取った Windows 10 のバックアップが戻せるか不安で仕方なかったので、VirtualBox に戻せるか試した。
そもそもなぜ clonezilla を試したかったのか?
- OSS のツールが欲しかった。
- 確実に余計なことをしないツールが欲しかった。
- OSS なやつの NTFS サポートが 2020 年の Windows 10 時代においても戦えるものなのか知りたかった。
clonezilla のウィザードに従っては自動レストアできなかった
ターゲットディスクのパーティションが作り直されたあとで、書くパーティションごとのレストアを進行するはずだが、
"gzip: stdin: unexpected end of file"
みたいなやつがでて、そもそも個々のイメージをうまく読み込めない致命的な問題が発生。
*.gz.aa を全部結合したうえで展開して sda4.ntfs-ptcl-img のようなファイルに置き換えてもダメ。
ログに残っていた ocs- から始まるコマンドを実行してみてもダメ。
partclone.restore で手作業レストアで解決
partclone.restore というコマンドがあったので、これを試したらうまくいった。
cat sda4.ntfs-ptcl-img.gz.* | gunzip | partclone.restore --overwrite /dev/sda4
各パーティションごとにやれば何も問題なく完了。
理由は知らないけど、dstat で見てると 10MB/s くらいずつしか処理されてない感じがあってちょっとつらかった。
レストア終了後にやったこと
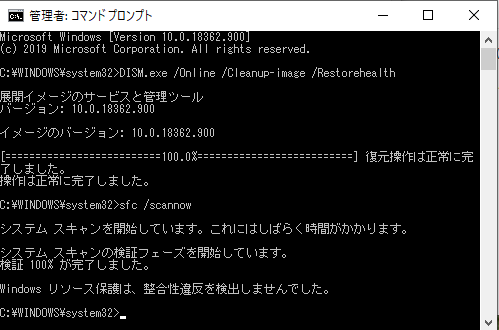
Windows 10 でシステム ファイル チェッカーを使う のファイルシステムチェッカーのテストは通った。
当然 VirtualBox 内にレストアした Windows 10 のライセンスはないので、VM は削除した。
AQUOS テレビのリモコンが効かなくなったので代替手段を Arduino 的な物で代替できるか調べる Posted on Mar 26, 2016
自宅の AQUOS テレビのリモコンが効かなくなりました。
幸いにも RS-232C で制御できるタイプのテレビであったため、Arduino 的な物で代替できるか調べることにしました。
まずは、RS-232C の口が生きているかの確認です。 Go で実装されている Go Library for SHARP AQUOS TV の example を使って、コマンドが実行され生きていることを確認しました。
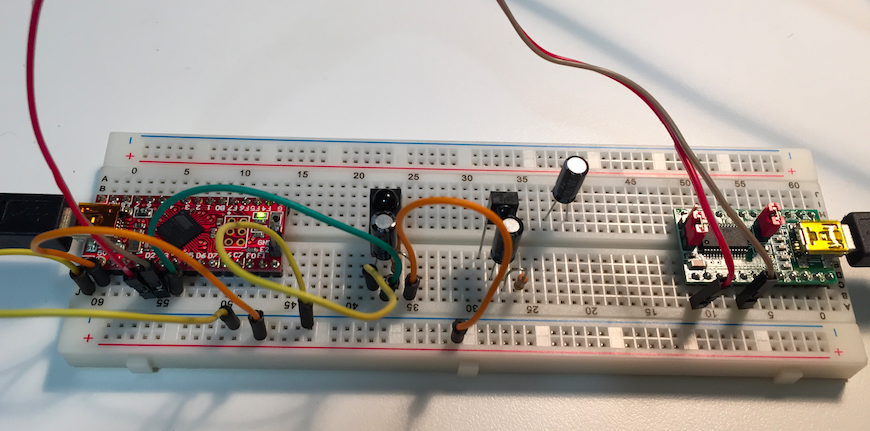
手元に USB の RS-232C 接続ケーブルがなかったので、 FT232RL USBシリアル変換モジュール から 3V,3.3V,5V系−RS232レベル変換基板 につないで、信号レベルを RS-232C レベルにし、 IC テストクリップでテレビから延長してきた RS-232C コネクタのオスのピンをつまみ実験しました。
続いて、Arduino 的な物についてです。
困ったときにいつも参照させて頂いている ChaN 氏の 赤外線リモコン制御モジュール を 手元の ダ・ヴィンチ32U 上で動くようにし、USART につないだ FT232RL 経由で、リモコンのコマンドを受け取れるところまで確認できました。
ここで、なぜか SONY 形式の信号が検出され、SHARP の AEHA 形式な信号が来ないことから BDレコーダのリモコンのTVメーカー設定がなぜかずれていたことに気づくことになりました。 再設定したところ、無事テレビが使えるようになりました。めでたしめでたしというしょーもない終わりになりました。
まー、やりたいことができること一応確認するという意味で、受け取ったリモコンの信号で RS-232C に指定した文字を吐くってのを PC 上でできたところで今回はおしまいということに。
テレビが壊れて無くてヨカッタ。
おかげで、AVR と、各種電解コンデンサの詰め合わせと、赤外線受光モジュールのストックを確保できました。 また、電線繋いで、Web で公開されているプログラムを動かすぐだけではありますが、久しぶりに “電子工作” を再開することができました。
めでたしめでたし。
The Go Programming Language Specification の epub を自分用に作る Posted on Feb 3, 2016
curl で html 取ってきて、上下の不要部分を取り除いた後、calibre の ebook-convert 使って変換。
iPhone に入ったので、いつでもどこでも見れる!
go-slackproxy というものを作った Posted on Feb 1, 2016
複数の slack のネットワークにつないでいて、滅多に発言無いけど超重要なネットワークがあった場合、普段使ってる側に全文転送したい。
そこで、outgoing webhook で中継用の http な go-slackproxy に POST して、go-slackproxy が別の slack の incoming webhook を叩く君を作った。
slack のインテグレーションの設定画面で迷子になったけど、便利になった!
2015年の振り返り Posted on Dec 26, 2015
2015年も残りわずかとなったわけですが、自分にとっては初の試みである振り返りをしてみる。
8月
変な電子工作頑張った。
12月
qiita の advant calendar がんばった。
- git のコミットハッシュを取得して android アプリのバージョン番号にする
- Treasure Data の集計結果を Elasticsearch に保存して利用する
- qiita Advent Calendar に「なんか」って書いてる数を数えてみる
- ulimit を docker の daemon 起動時に指定したい
- 状態がおかしくなった Linux マシンをさくっと再起動する方法
- Amazon Glacier に afio でランダムアクセス可能なファイル送りつけてバックアップする
まとめ
- 来年はもうちょい「これやったよー!」って言えること頑張っていきたい!
littlebits のコネクタ bitsnaps を探す Posted on Dec 26, 2015
littlebits のコネクタを探していた。
- 2 Protoモジュール
- 1 Perfモジュール
- 12 bitSnaps(6オス、6メス)
が入って 5,400円。
BITSNAPS (コネクタだけ) は、6ペア $15.95、1,915円であった。
Atmel AVR ATmega32U4 で Matias Half Keyboard っぽいのを作った Posted on Aug 24, 2015

背景
タブレットの裏にキーボード貼ったら iikanji に使えるんじゃねと思い、部品集めて作ってみました。
Matias Half Keyboard ってのが過去に出てたことはあるけど、すでに本家サイトでしか買えるところがなく、値段がかなり跳ね上がっておりました。
Matias Half Keyboard は左手で使う用に作られています。普通に文字を打つと、左手でタイプした文字が入力されます。 一方で、スペースキーを押している間だけ、右手領域の文字をタイプしたことにできるキーボードです。 詳しくは 半分サイズのキーボード「Matias Half-Keyboard」を読むと書いてあります。
それを作りたかったので、それっぽいものを作ってみました。
部品
使った部品は以下の通り。
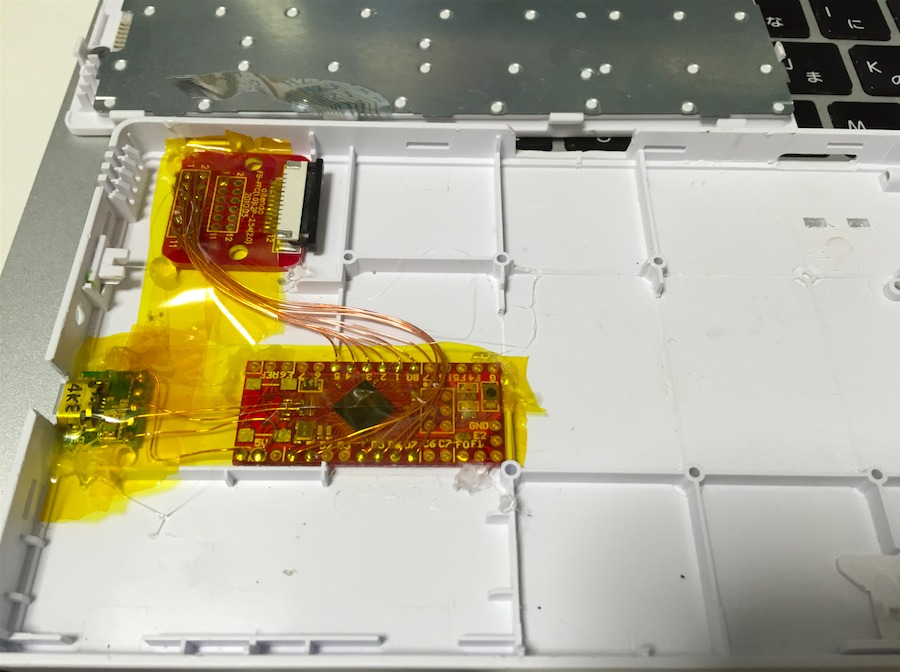
- BUFFALO の セパレート折りたたみキーボード (BSKBB14) の左半分
- Strawberry Linux の ダ・ヴィンチ32U (ATmega32U4)
- aitendo の FFC 基板付きコネクタ
- 秋月電子の ブレッドボード用マイクロBメスUSBコネクタDIP化キット
ハードウェアとソフトウェア
ソフトウエアは以下の通り。
tmk_keyboard が、既存のキーボードの基板を AVR で置き換えてキーバインドをこねくりまわすことに特化したソフトウェアで、データの取り方とかマトリックスの配列書くだけで、Fn とかの処理まで全部やってくれて、とても素敵でした。
ハードウェア的には、AVR 内蔵のプルアップ抵抗使ったので、がんばって電線を半田付けしただけのカンタン工作です。
キーボードマトリクスの ROW として PD0-1,PD4-7、COL として PB0-5 にキーボードの左半分を繋ぎました。 PD2-3 は、RXD TXD なので、デバッグ用として残してあります。
ROW は行の選択、COL は選択された行で押されているボタンの検出に使います。
まず、COL をプルアップ付き入力にしておきます。 つぎに、ROW を全部ハイインピーダンスにして切り離しておきます。
読み取りたい ROW だけを L にするループを回します。 それぞれの ROW に対して COL の状態を読み取りマトリックスに反映します。 COL は、プルアップされているので、1 になってるビットは押されてない、0 になってるビットは押されてるという風な流れです。
このような感じでマトリックスを作っておけば、あとは tmk_keyboard が色々面倒いところをやってくれるのです。
使い心地
タブレットの裏にキーボード貼って頑張って使おうとすると、腕がつりそうになることがわかりました。
Enter キーの割り当てがよくないところにあるなーとか思っておりますが、完成初日以来二度と使っておりません。。。
最後に
満足感は半端ないので、ヨカッタ。
OSX の TimeMachine で exFAT な USB ハードディスクにバックアップ Posted on Aug 23, 2015
やりたいこと
タイトルの通り、OSX の TimeMachine で exFAT な USB ハードディスクにバックアップをとりたい。
手順
- ディスクユーティリティでスパースバンドル作る
- 開いたスパースバンドルを開く
diskutil listでどの/dev/diskXsYに割り当てられているか調べるdiskutil enableOwnership /dev/diskXsYtmutil setdestination '/Volumes/hogehoge'- システム環境設定の TimeMachine 見るとバックアップ先が変わっている
参考
Lenovo Miix2 8 59428524 (今年買った Windows 8.1 タブレット) Posted on Dec 11, 2014
購入
これは、先日、25,800円になってるのをどこかで見て衝動的にポチったやつです。
Office Home and Business が着いてくることを考えたら異常に安いお値段です。(単純に比較できないライセンスではあるけど)
フルタッチキーボード
縦向きで持てば、立ったままでタッチキーボードが普通に使えます。
フルコントロールできるのはすばらしいことです。
Ctrl Shift Alt ESC 矢印が、ほぼいつもの配列で確実に使えるのは大きいです。
重さ
重さは 350g で、Nexus7(2012) とほぼ同じか、iPad mini シリーズより多少重い程度でした。
解像度
解像度は 1280x800 しかないですが、特に不自由は感じていない感じです。 このタブレット使うときは、
- VirtualBox に入れてある ubuntu で、ちょっとした小さなスクリプトを思いつきで書く
- どっかのサーバに ssh か mosh 繋いで何か探求する
- pdf な電子書籍を読む
- テキスト主体サイトを読む (この時期は advent calendar)
- 家で ネットワーク経由で GOM Player で動画を見る
っていうライト感じだからなのもあるでしょう。
タップできる領域を考えると当たり前だ!って言われそうな気はします。
ディスク容量
eMMC 64GB モデル(リカバリに10GB取られてる模様)だったので、今のところ困ってない感じです。
まとめ
わりと制約無くて便利だから、みんなもおもちゃとして買うと良いよってことでした。
 Lenovo Miix 2 8(Z3740/2G/64GB/Office H&B/8.0HD)59428524 保護フィルム付き
